10 DIY Cat Gate & Barrier Plans You Can Make Today (With Pictures)
By Lorre Luther
Updated on

Cats can be curious, which may make the use of some type of gate or barrier necessary to protect your cat, other pets, plants, or home. However, cats can also be sneaky and difficult to contain, which can make it nearly impossible to find a barrier that contains your cat.
If your cat is regularly sneaking into places they don’t belong, you’re in luck. There are multiple barriers and gates you can DIY at home today, sometimes even with items you already have on hand. Keep reading for some easy and affordable plans for cat gates and barriers.

The 10 DIY Cat Gate and Barrier Plans
1. Wire Shelf Barrier by PetHelpful
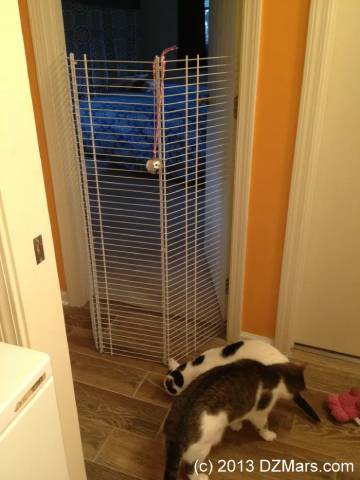
| Supplies needed: | Wire shelves (3), zip ties or cable ties, scissors |
| Skill level: | Easy to moderate |
| Escape proof?: | 3/5 |
This cat barrier is easy and affordable to make and requires minimal technical know-how to create. The best part is that they allow you to safely block your cat out of an area without having to shut the door.
Wire shelves come pre-cut at around 4 feet in length, but some home improvement stores will also cut these shelves to size if needed. They should be about 16 inches wide and have a small lip to help them fit together better.
Special Considerations
This barrier can be extremely easy to create, but it may require additional knowledge if you plan to attach the barrier in a semi-permanent fashion. This can be done with something as simple as Velcro or Command Strips or something as complicated as wall anchors.
The more securely this barrier is anchored, the more escape-proof it will be. If you simply prop the barrier up in a doorway or use shelves that are shorter than the height of the door, a committed cat will easily find a way around the barrier.
2. Extra Large Lattice Cat Gate by Kitty Loaf
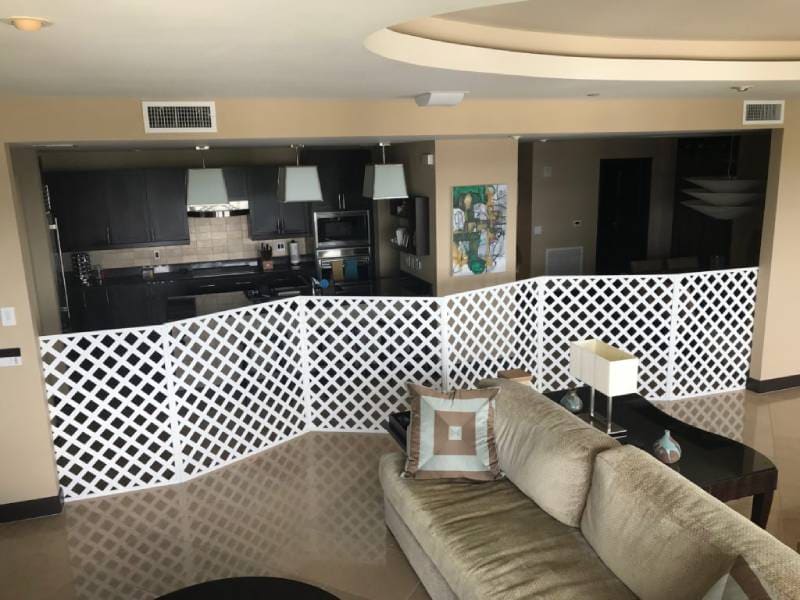
| Supplies needed: | 4’x8’ vinyl lattice (3), lattice caps (12), screws, zip ties |
| Skill level: | Moderate to hard |
| Escape proof?: | 3/5 |
This extra-large cat gate is ideal for cats that can’t or won’t jump more than about 4 feet. You’ll be cutting (or paying someone to cut) the lattice pieces in half, leaving you with six 4’x4’ pieces. You can, however, make it as tall or as short as you’d like.
This is a fantastic option if you have a large space that most pet and baby gates and barriers won’t fit. If made as instructed, this ends up being around 20 feet long. It won’t allow your cat under or around it if attached to the walls at both ends of the open space.
Special Considerations
Although you can DIY this barrier in an afternoon, it is a multi-step process that requires power tools and technical knowledge. You’ll need access to a power drill, clamps, and a saw to create this cat gate. While most home improvement stores will cut your pieces for you, they’re not likely to help you put everything together.
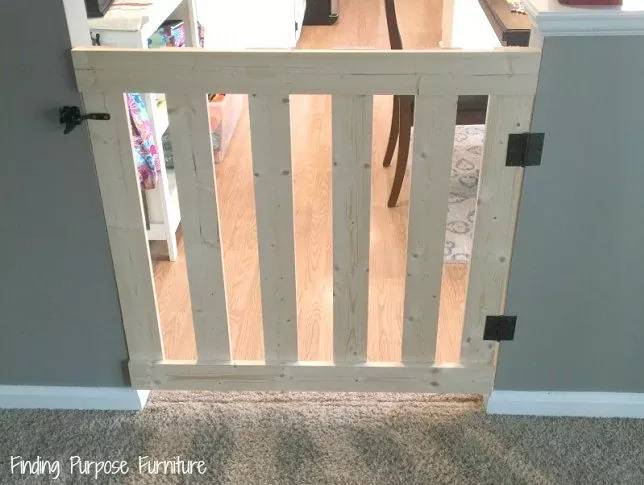
3. Baby Crib Cat Gate by Little Victorian
| Supplies needed: | Baby crib frame, hinges (2), door latch, spray paint (optional) |
| Skill level: | Moderate |
| Escape proof?: | 3/5 |
Whether you have an old baby crib in your attic or a local “buy-nothing” group, you can get an old baby crib for free or for a minimal expense. To make this cat gate, you’ll need a piece of a crib’s frame that fits the width of your door, so some cutting may be necessary when dealing with unusual doorway or crib sizes.
This cat barrier isn’t going to keep kittens or small cats contained, but it is a good option for large cats or cats that aren’t going to attempt to squeeze between the slats or jump the gate.
Special Considerations
If cutting the crib’s frame is necessary to fit your space, an electric saw will be necessary. You’ll need some knowledge of how to cap or otherwise cover the cut ends to protect your cat from accidental injury on sharp edges. You’ll also need a power drill to install the hinges and door latch.
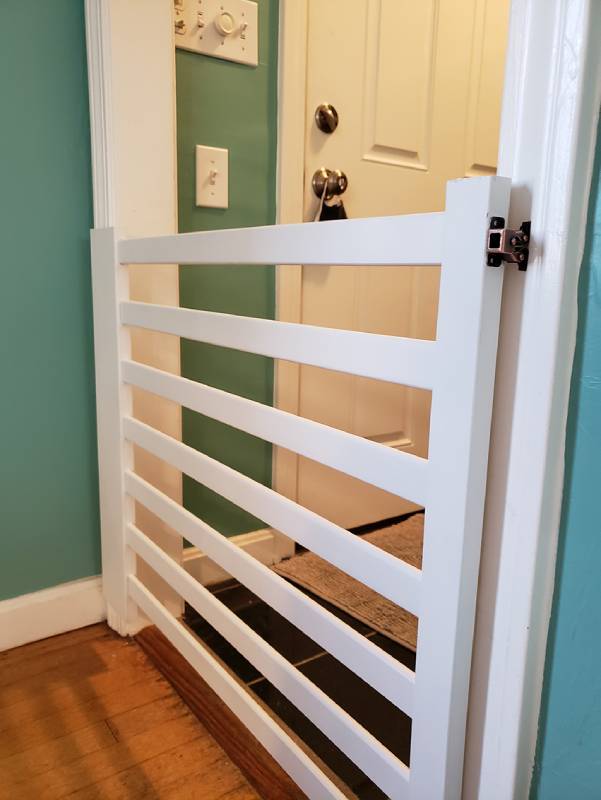
4. Spare Wood Cat Gate by Home Talk
| Supplies needed: | 2”x4” wood, hinges (2), door latch |
| Skill level: | Moderate |
| Escape proof?: | 5/5 |
This cat gate is easy and inexpensive to make and can be made with whatever scrap wood you have lying around in your garage. Ideally, any rough wood should be sanded smooth before use to prevent splinters and scrapes.
This cat gate looks like the baby crib cat gate, but the width between the slats and the overall height and size of the gate is fully customizable. For someone experienced in measuring and cutting wood, as well as simple installations, like hinges, this gate can be made and installed in under an hour.
Special Considerations
Unless you have spare wood that is already the correct size for your space, you’ll need access to an electric saw. You’ll also need a power drill to install the hinges and the door latch.
If you’re concerned about your cat jumping this gate, you can adjust the height to suit your needs. If you install the slats horizontally, you’ll give your cat a foothold, so plan to install them vertically to prevent climbing.
5. PVC Pipe Cat Gate by ehow
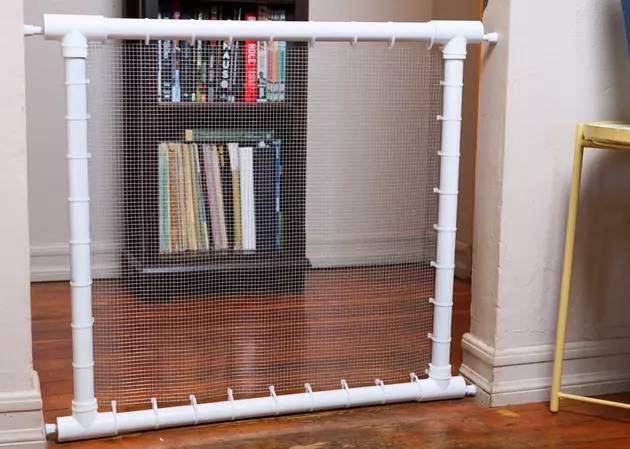
| Supplies needed: | 1” PVC pipe (4), PVC T-connector (4), zip ties or cable ties, cat fencing or hardware cloth, tension rod (2) |
| Skill level: | Moderate |
| Escape proof?: | 3/5 |
PVC pipes are inexpensive and lightweight, making them ideal for many types of DIY projects. This gate operates like a baby gate but costs a fraction of the price. You can put it together in under an hour, and it doesn’t require any installation or wall damage.
You can customize these instructions to fit your needs. The height and materials can be adjusted to keep your cat securely on one side of the barrier. You can even customize this to be oversized for large spaces, assuming you can find tension rods to fit!
Special Considerations
Unless you’re lucky enough to have pre-cut PVC that fits perfectly on hand, you’ll need to cut the PVC to fit or have someone at the home improvement store do it for you.
To add to the security of this cat gate, you can adhere the PVC T-connectors to the PVC pipe with super-glue or another strong adhesive. Make sure you securely install the hardware cloth to the frame to keep your cat from finding weak spots and slipping out.
6. Simple Wire Shelf Cat Gate by Dani Elizabeth

| Supplies needed: | Wire shelving, plastic wall anchors, key and eye hooks, zip ties, drill, scissors, screwdriver, drill (optional) |
| Skill level: | Moderate |
| Escape proof?: | 4/5 |
While this DIY project may require you to head to the store to purchase wire shelving, it’s still likely to cost less than you’d spend on a new cat gate. It’s designed to be installed at the top of stairs, as one edge of the barrier wedges behind the railing, keeping cats in but allowing you to open and close the gate like a door.
The other side is attached to a wall using zip ties and screw eyes. To create the barrier, bind the wire shelves together using zip ties. Drywall anchors should be used to ensure the screw eyes stay fastened to the wall.
Special Considerations
This gate is nice and tall, making it an excellent choice for particularly active and athletic cats that may be able to escape from lower barriers. Don’t forget to ensure the area around the fence is free of furniture, as cats can use items such as chairs and console tables to launch themselves over even the most solidly constructed, extra-high gates.
7. Stylish Top-Of-Stairway Gate by Megan Bell
| Supplies needed: | Measuring tape, pine boards, wood glue, nails, hammer, weights, wood filler, nail punch, sandpaper, sander, primer, paint, paintbrush, drop cloth, hinges, latch |
| Skill level: | Moderate |
| Escape proof?: | 4/5 |
This incredibly stylish slatted cat gate is designed to fit at the top of stairs, but with a few tweaks, it can also work in doorways. It’s relatively straightforward to complete and looks amazing when installed. And best of all, it can be finished in less than a day. Because it’s mounted, you’ll need to measure the area precisely to ensure everything fits.
However, that’s also what makes the project so flexible; you can adapt the basic plan to make the barrier as high or wide as you’d like. Place the slats relatively close together to prevent your cat from wiggling through. You’ll likely need to head to the hardware store to have lumber cut.
Special Considerations
While it’s possible to leave the wood unpainted, there are benefits to giving your gate a coat or two of paint. Paint the door a gorgeous bright shade to add a pop of color, or select an option that mirrors the colors of your walls and baseboards. Satin-finish paint is often a great choice for gates and barriers, as the finish makes wiping off paw prints and smudge marks easier.
8. Plexiglass Cat Gate by Chris Loves Julia

| Supplies needed: | Lumber, hinges, latch, screws, wood filler, sandpaper, table, drill, saw/router, plexiglass, screws |
| Skill level: | Moderate to High |
| Escape proof?: | 4/5 |
While this cat gate is designed to fit at the top of stairs, it can also block doorways if you install it using the right hardware. It’s essentially a fit-to-measure barrier with plexiglass installed in a groove in the bottom part of a wooden frame. It’s a relatively simple project for those who feel comfortable using power tools, but it requires some planning.
Special Considerations
The tricky part of the project involves cutting the groove in the bottom piece of lumber to hold the plexiglass securely. If you have a router on hand (or easy access to one), you’re all set. Alternatively, you can use multiple passes of a table saw to create a channel in the wood, which should be wide enough for the plexiglass to slip into. Consider pre-drilling the holes for the screws to prevent the wood from splitting when putting the frame together.
9. Saloon Style Doors by Madness & Method

| Supplies needed: | Lumber, miter saw, pinch clamps, table clamps, hole jig system, drill, screws, sandpaper, paint or stain, paintbrush, nail gun, nails, hinges, lock |
| Skill level: | Advanced |
| Escape proof?: | 4/5 |
Almost floor-length saloon doors make incredibly attractive pet gates. These double-swinging doors can be installed in virtually any doorway. Because the gate needs to have a nice tight fit to keep pets where they’re supposed to be, make sure to get accurate measurements before heading to the home improvement store to load up on supplies. You can install slide locks to prevent the doors from being pushed open, but remember that doors that are too high can be difficult to reach over and open if you’re on the side without the lock.
Special Considerations
These saloon doors are not only attractive but have the potential to add a bit of style to your home while keeping your pet safe. It’s an excellent option for experienced DIYers. The plans call for creating pocket holes, which keep the frame from becoming too bulky when assembled. Consider experimenting with different hinge and lock options to get the best barrier for your needs.
10. Wooden Gate Featuring Plexiglass by Home Road

| Supplies needed: | Staples, washers, screws, lumber, paintbrush, stain, wire mesh, nails, hammer, plexiglass, zip ties, drill, plexiglass drill bit, measuring tape |
| Skill level: | Moderate |
| Escape proof?: | 3/5 |
A few pieces of lumber, mesh, and some home-improvement basics are all you need to complete this attractive and practical gate that can be placed between any two standing structures. If you have a particularly athletic pet, consider extending the vertical dimensions of the gate to prevent your buddy from jumping over. The barrier’s frame can be as high and wide as you’d like, and it’s perfect for locations with difficult-to-fit measurements. Use plexiglass to cover the side of the gate your pet will be on to keep them from climbing to freedom.
Special Considerations
Plexiglass can be tricky to drill holes in, as it’s incredibly prone to cracking. There are special bits that make it easy to drill holes into plexiglass, and most can be used with regular drills. Go slowly, and make sure to measure and mark where you want the holes to go before getting started with drilling. It’s also possible to drill holes in plexiglass using a regular drill bit. You’ll start off with a small pilot hole and gradually increase your drill bit diameter until the hole is the size you need.

Conclusion
Whether you’re tight on time, patience, or funds, there’s an option here to meet your needs. Not all DIY cat gates and barriers are created equal, so make sure to choose one that you feel will suit your cat’s curiosity and commitment level. Some cats are dedicated to mischief, so you may find it challenging to create the perfect DIY barrier to keep your cat secure. However, with trial and error, you’ll quickly identify weak spots in your project and be able to adjust things as you need.
Featured Image Credit: Patrick Hatt, Shutterstock