How to Clean Aquarium Gravel – Quick & Easy Step-by-Step Guide
Updated on

Aquarium gravel can get dirty for a variety of reasons. It is not uncommon for new aquariums to have cloudy water after adding gravel, especially if it has not been rinsed prior. No one wants a cloudy tank once you add your gravel and prepare to run your new aquarium, which makes it essential to wash gravel before placing it into the aquarium.
Cleaning the aquarium gravel helps to keep the aquarium looking clean and fresh while reducing turbidity in newly set-up aquariums.
Before reaching for the soap and boiling water, this article will explain how you can safely clean gravel for your fish without damaging the gravel.

Does Aquarium Gravel Need To Be Cleaned?
There is no harm in cleaning your aquarium gravel the right way and for the right reasons.
You can either clean the gravel when it is inside the aquarium by using a gravel vacuum, or by using a cleaning solution. The former option is great for weekly gravel cleaning, whereas the latter is better in situations where the gravel needs a deep clean due to algae growth, staining, discoloration, or sanitizing the gravel from pathogens in aquariums with sick fish.
Gravel can also grow algae or diatoms on it, making it look unsightly. This is especially common with white and light-colored gravel which shows discoloration easily, making it necessary for the gravel to be cleaned. Regardless of how clean you keep the aquarium; the gravel is bound to get dirty.

Preparing To Clean Aquarium Gravel
Cleaning aquarium gravel is fairly simple, but there are a few tips that can help make the process even easier.
- Avoid using any harsh soaps, chemical-based surfactants, and glass cleaners. These harsh cleaners can make their way into the aquarium water and be dangerous to the live inhabitants.
- You can either use white spirit vinegar, baking soda, or a hydrogen peroxide cleaning solution to remove algae growth and stains and sanitize the gravel. This is a good replacement for harsh chemical-based cleaning solutions. However, the gravel will still need to be thoroughly rinsed.
- Place a plug into the sink’s drain to prevent gravel from falling down and potentially clogging the pipes.
- Use lukewarm water instead of water that is too hot or cold, as this is a comfortable temperature to work with.
- Do not boil the gravel on the stove or pour boiling water over the gravel. This can chip the coloring on most gravel and cause it to leach out faster.
- A fine-meshed baking sieve works well when it comes to rinsing gravel.
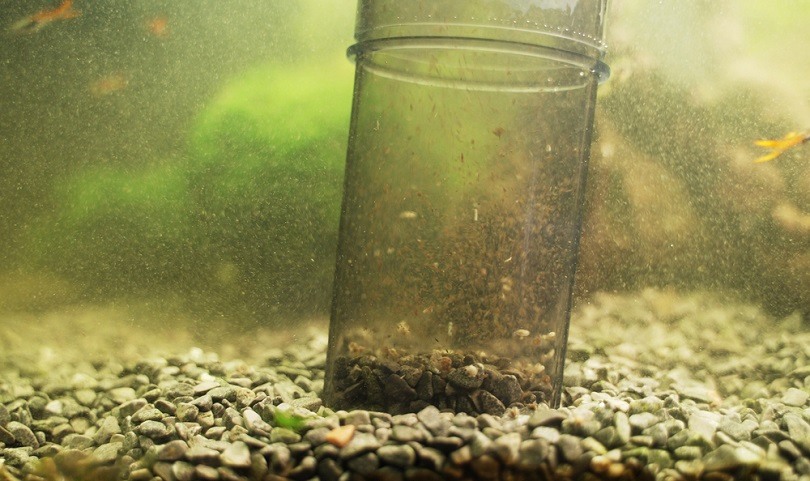
- Gravel vacuums work well to remove large particles of dirt without having to remove the gravel from the aquarium.
- A medium to large-sized fine-meshed sieve.
- A bucket or large container.
- A gravel vacuum or siphon for maintenance.
- A scoop or large spoon.
- A solution of 8 ounces (1 cup) of water and 3 teaspoons of white vinegar and 1 teaspoon of bicarbonate soda, or 1 teaspoon of hydrogen peroxide per gallon of water.
Guide to Cleaning Aquarium Gravel Step-by-Step
New Gravel
Before adding new gravel to your aquarium, you need to give it a rinse first. Gravel straight from the package contains a lot of dust and dirt that can cloud your aquarium water.
- Pour the new bag of gravel into a large sieve used for sifting flour.
- Place a container or plug over the sink drain to catch any falling pieces of gravel.
- Place the sieve underneath the tap and run lukewarm water over it. You may notice that the water becomes discolored during the rinse.
- Move the gravel around under the tap to ensure each section of gravel is getting a thorough rinse.
- The rinsing process can take several minutes, and it is completed once the water runs clear.

Once you have rinsed the new gravel, you can now place it into the aquarium and fill it up with water. You should notice little to no cloudiness in the water if the gravel has been rinsed properly.
Old Gravel or Reusing Gravel
If you are taking out old gravel from an aquarium to clean it, a good rinse usually won’t do the trick. Perhaps the gravel is becoming stained from long-term use and needs a good clean, or if there is a lot of dirt accumulating in the gravel and you don’t want to gravel vacuum it.
- Turn off the heater and filter in the aquarium.
- Remove large decorations and plants that are covering the gravel.
- Use a scoop to collect the gravel to place it into a separate container.
- Fill the separate container or bucket with lukewarm water and add your desired cleaning solution. White spirit vinegar or a mixture of hydrogen peroxide and water works well.
- Add the cleaning solution to the bucket of gravel and use a spoon to mix the gravel around.
- Allow the gravel to soak in the cleaning solution for 30 to 45 minutes depending on how dirty the gravel is.
- Pour the gravel into a baking sieve.
- Rinse the gravel in the baking sieve thoroughly under a tap to rinse off the cleaning solution.
- Place the gravel onto a clean towel.
- You can now add the gravel back into the aquarium free from algae and discoloration.
This method can be useful if you want to reuse gravel or sanitize it after it has been used in an aquarium with sick fish or in an old aquarium where the fish have died. A solution of hydrogen peroxide and water is the better option in this case.
 Maintaining Aquarium Gravel
 Maintaining Aquarium Gravel
A common mistake that new aquarium keepers make is cleaning the gravel too often through rinsing and sanitizing. There is a misconception that aquarium gravel needs to be cleaned regularly in an aquarium, but this is not true and potentially damaging to the aquarium’s cycling process and establishment of beneficial bacteria.
Keep in mind that gravel holds colonies of beneficial bacteria in established aquariums. It is not necessary to remove the gravel each time you are cleaning the aquarium.
Doing so can do more harm than good and disrupt all the beneficial bacteria that have established themselves in the aquarium. This bacterium is responsible for converting the inhabitant’s waste into a less toxic version.
Instead of taking the gravel out to be washed when you are doing aquarium maintenance, you can use a gravel vacuum or siphon instead. All you need to do is suction out dirt, leftover food, and any gunk that has accumulated in the gravel instead of having to remove and wash it each time.
This saves you a lot of time and makes cleaning the gravel less tedious. Regularly removing the gravel from the aquarium to wash it can also cause cloudiness from a bacterial bloom. If you remove the gravel from the aquarium and notice an accumulation of dirt and gunk, use a gravel vacuum to remove the larger particles that get left behind.

Final Thoughts
Keeping the gravel clean is easy if you use a gravel vacuum. This is the preferred method of cleaning the gravel and it suctions out the aquarium water at the same time, which makes it easy to do water changes. When the aquarium gravel is new or needs to be sanitized, removing the gravel from the aquarium becomes necessary.
If you do plan to use a cleaning solution, ensure that the gravel is rinsed thoroughly before being added back into the aquarium. To prevent clouding in aquariums with new gravel, a thorough rinse under running water will suffice.
Featured Image Credit: Dmitri Ma, Shutterstock