15 DIY Cat Toys You Can Make Today (With Pictures)

Updated on

Cats need toys for enrichment and to stimulate their natural instincts. A bored kitty can develop destructive and unwanted behaviors. However, cat toys can be expensive, and it’s common for them to get lost or ripped up as your cat chases them around in tight spaces and underneath furniture. If you find yourself constantly replacing cat toys, you may want to try making your own to save on costs.
We know that your time is precious, so this list has plans for simple yet entertaining DIY cat toys. You can complete these crafts quickly and have more time to play with your cat.
The 15 DIY Cat Toys You Can Make Today
1. Wine Cork Toys by Cuteness
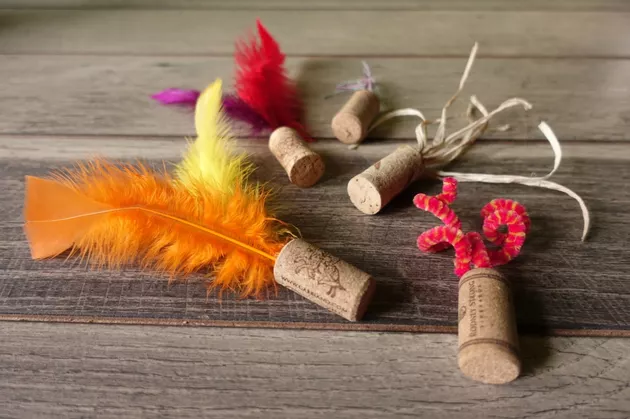
The next time you finish a bottle of wine, save the cork, and use it to make a toy. You can customize this toy and get creative with different kinds of materials to draw your cat’s attention. You can also attach a long piece of string to it so it becomes an enticing wand toy. The possibilities are endless, and these toys will provide endless hours of entertainment toyour cat.
- Wine corks
- Trimmings (feathers, string, ribbon, etc.)
- Epoxy
- Knife
- Scissors
- Boil the wine corks in water to remove leftover wine and soften the cork.
- Use a knife to poke a 1-inch hole that’s wide enough to fit your trimmings.
- Let the cork dry.
- Twist the ends of the trimmings so they fit inside the hole.
- Add epoxy to the hole, roll the ends of the trimmings in epoxy, and stick them inside the hole. Make sure the hole doesn’t have any air pockets or gaps inside.
- Wait for the toy to completely dry before letting your cat play with it.
2. Expedit Double-Decker Cat Snug/Scratch Post by IKEA Hackers

A simple cube shelf can become a fun and cozy apartment for your cat. All you need is a pillow or mat that fits inside the cube and sisal rope. You can add personal touches by dyeing the sisal a different color, using pillows with fun patterns and designs, or painting the cube with non-toxic paint.
While the plan uses a single-shelf unit from IKEA, you can use one with multiple levels instead. You can also wrap a wooden board in sisal and lean it against the shelf as a ramp. You can spend a day configuring the cube shelf so it contains all your cat’s favorite things.
- Cube shelf
- Pillows or padded mats
- Sisal
- Hammer and nails
- Quick-drying super glue
- Adhesive Velcro (optional)
- Yarn (optional)
- Pompoms (optional)
-
The most challenging part of this craft is making the scratching post part. There are two ways that you can do this:
- Nail one end of the sisal to the side of the cube with a U-shaped nail. Tightly wrap the rope around the side of the cube, keeping it as even as possible. When you have fully or partially covered the side or reached the end of the rope, put in another nail. On the outward-facing side (where your cat will be doing the scratching), put two more nails at the bottom and at the top, to ensure that the rope stays in place.
- Start by taking one end of the sisal and applying the quick-drying super glue that covers about 1 inch of the rope. Once the glue dries completely, nail the glued end of the sisal to the base of one of the sides of the cube. Tightly wrap the sisal around the side of the cube. If you run out of sisal, use the quick-drying super glue on the end of the sisal, and nail down the sisal after the glue dries. Keep wrapping the sisal until one side of the cube is partially or completely covered, whichever is your preference.
- Add cushions to the compartments, using adhesive Velcro to keep them in place.
- For extra decorations, tie yarn to pompoms to create swatting toys, and glue them to the top of the compartments.
3. DIY Wand Toy by Outnumbered 3 to 1

Super energetic cats can end up breaking multiple wand toys. If you’ve gone through several wand toys, this toy is an affordable option that you can use to keep your cat entertained. You can make different kinds of designs and attach multiple strands of yarn to create a cat wand with many attachments for your cat to chase.
With all the different creations you can make, your cat will stay interested and have endless hours of fun stalking, chasing, and pouncing on these toys.
- Chopstick or skewer (shaved off sharp end)
- Yarn
- Hot glue gun
- Beads
- Feathers
- Bells
- Tie yarn of any length to the end of a chopstick or skewer. Cover the knot with hot glue to reinforce its placement.
- String beads and bells on the yarn.
- Tie feathers to the other end of the yarn, and use hot glue to keep them in place.
- Wait for the glue to dry completely before playing with your cat.
4. DIY T-Shirt Cat Tent by Instructables

If your cat likes cozy, dim places, you can make as many DIY cat tents as you want and place them all throughout your home. This project doesn’t require any fancy equipment, and it uses materials that you’ll probably already have in your house. All you need is duct tape, a cardboard base, wire coat hangers, and an old t-shirt.
This project is so easy and fun to make that you might start looking for patterns that your cat would like the next time you’re shopping for a new shirt!
- Duct tape
- Cardboard base large enough for your cat
- Two coat hangers
- Pliers or wire cutters
- T-shirt
- Cut off the twisted end and hook of both coat hangers.
- Reshape the coat hangers so they become half circles.
- Crisscross the coat hangers, and tape the middle where the wires intersect. The result should look like the framework of a tent.
- Poke holes in the corners of the cardboard.
- Insert about 1 inch of each end of the coat hangers into the hole.
- Bend the ends of the coat hangers so they lie flat against the cardboard. Tape down the bent ends to keep the coat hangers securely in place.
- Pull the shirt over the tent frame, and let the neck hole rest on one side of the frame, so your cat can easily step in and out of it.
- Gather the other ends of the shirt at the bottom of the base and tape them down.
- For additional comfort, stuff a small pillow or cushion inside the tent.
5. DIY Toilet Paper Tube Toy by PetHelpful
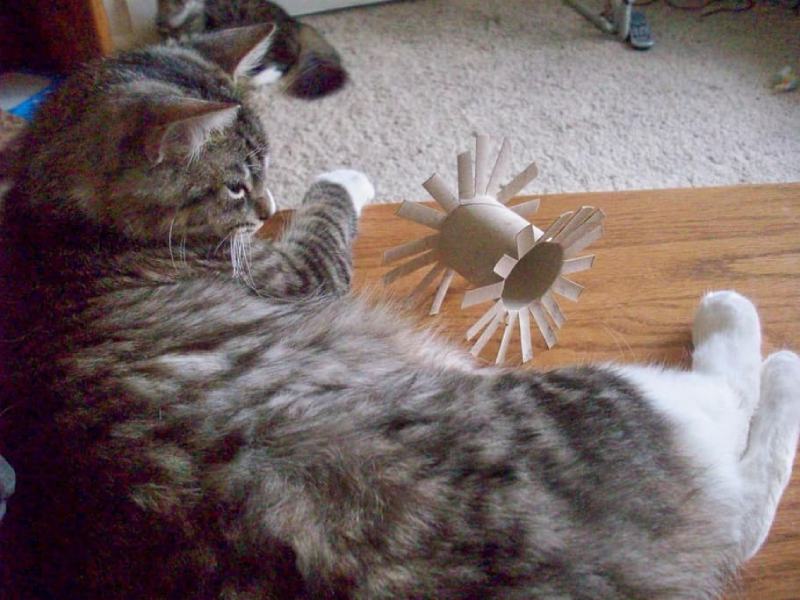
Something as simple as a toilet paper tube can quickly be transformed into an engaging toy for your cat. This project involves repurposing a toilet paper tube. This toy is quick and extremely cheap to make. Most homes will always have empty toilet paper rolls available, so you can make this toy regularly.
- Toilet paper tube
- Scissors
- Start by preparing your toilet paper tube. Remove any bits of toilet paper from the tube.
- Next, begin cutting 1-inch slits on one end of the tube. Go all the way around the tube. You should make each slit about 1/4 inch apart.
- Repeat cutting the slits on the other end of the tube. Again, the slits should be 1 inch long and 1/4 inch apart.
- Now, splay the slits so the tube looks like a wheel with spokes.
- Toss the toy to your cat and watch them bat it around!
6. DIY Catnip-Stuffed Mouse Toy by Lia Griffith
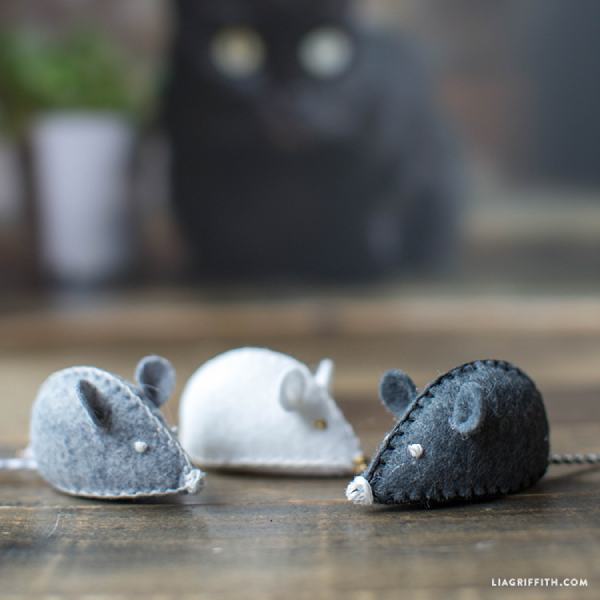
Here’s a wonderful way to extend your craft passion to your furry friends. By creating this adorable DIY catnip-stuffed mouse toy, not only will you have fun making it, but your cat will also undoubtedly enjoy hours of fun playing with it. Handmade with love and filled with enticing catnip, this toy will quickly become your cat’s new favorite!
- Wool blend felt (white, slate, and marble shades)
- Embroidery thread (DMC Snow White B5200 and 168)
- Polyester fiberfill
- Fabric pen
- Catnip
- Twine
- Scissors
- Cricut maker
- Embroidery needles
- Clover applique sewing pins
- Stuffing tool or chopstick
- Needle threader (optional)
- First, download the pattern for the DIY cat toy. Print the PDF template and cut the templates.
- Next, transfer the chosen pattern using a fabric pen, such as the Dritz Disappearing Ink pen. Use the detailed scissors to cut out the pieces.
- Put together the toy following the tutorial provided. This involves sewing the felt pieces together using the embroidery thread, stuffing the mouse toy with the polyester fiberfill, and incorporating some catnip to make it all the more enticing for your feline friend.
- Lastly, attach a length of twine to act as the mouse’s tail.
7. DIY No-Sew Cat Toys by Southern Mom Loves
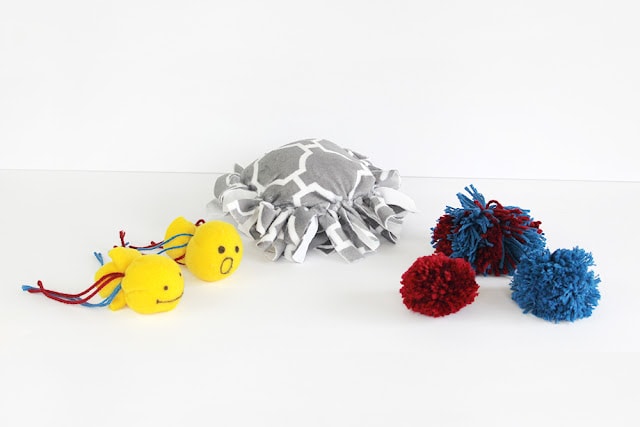
Not only will these DIY toys provide endless fun for your cats, but they’re also a fantastic way to recycle materials you may already have at home. They’re an ideal complement to your cat’s exercise plan and will aid in keeping them active and content. Your furry friends will love batting these around!
- Yarn or thick string
- Fabric scraps
- Stuffed animal stuffing or similar material
- Pipe cleaners
- Wrap the yarn or string around your hand multiple times. The more you wrap it, the denser your pom pom will be.
- Carefully slide the bundle off your hand, and tie a separate piece of yarn tightly around the middle.
- Cut through the loops at both ends of the bundle, and fluff it up to form a pom pom.
- Cut two squares of fabric of the same size. Make sure they are large enough for your cat to bat around.
- Cut several smaller strips of fabric to make the “tags.”
- Sandwich the tags between the two squares of fabric, making sure the tags point inward.
- Sew around the edges of the squares, leaving a small gap to turn the pillow inside out and for stuffing.
- Turn the pillow inside out so the tags are pointing outward, stuff it with a soft material, and sew the gap closed.
- Using pipe cleaners, shape them into the form of a goldfish, making sure there are no sharp ends.
- You can add eyes or other features using yarn or additional pipe cleaners.
8. DIY Jingle Bell Cat Wand by Irresistible Pets

A cat wand is an excellent interactive toy that encourages active play, keeping your furry friend happy and fit. Here’s a simple guide to creating an enchanting cat wand using everyday items you might have lying around the house. This delightful DIY project takes under 10 minutes to complete, and the result is a toy that your cat will find irresistible!
- 1 wooden dowel
- 3 jingle bells
- Variety of fabric scraps (ribbons, shoelaces, etc.)
- 1 roll of baker’s twine
- Scissors
- Fabric glue
- Start by wrapping the wooden dowel with the baker’s twine to give your cat wand an appealing look. Make sure to wrap it tightly and evenly around the dowel.
- Once you’ve finished wrapping, leave an extra 10–12 inches of twine at the end. This extra length will be used to attach the fabric scraps.
- Secure the end of the baker’s twine to the dowel using a small amount of fabric glue. This will prevent the twine from unwrapping and ensure the longevity of your cat wand.
- Gather your fabric scraps and tie them securely to the end of the twine. You can use different colors and types of fabric to make the wand more visually appealing to your cat.
- Finally, select three different fabric scraps, and tie a jingle bell to each one. The sound of the bells will stimulate your cat’s curiosity and keep them engaged during playtime.
9. DIY Feather and Bell Cat Toy by Martha Stewart
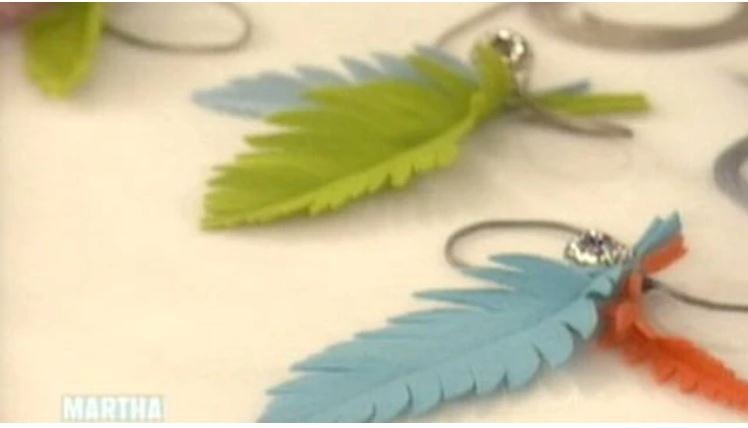
If your cat loves the thrill of the chase, this feather and bell toy is an absolute delight! It is simple to make, using just a few materials you may have lying around the house. Let’s get started on this entertaining DIY cat toy that will keep your furry friend happily engaged.
- Toy template
- Medium-weight wool felt of different colors
- Scissors
- Satin cord
- Iron
- Jump ring
- Jingle bells
- Begin by using the template as a guide. Cut one small and one large feather from two different-colored pieces of felt.
- Next, use the hot iron to create a crease in the middle of both feathers. This will give the feathers a more realistic appearance.
- Take a jingle bell and attach a jump ring to it.
- Now, slip 1 yard’s length of the satin cord through the jump ring attached to the jingle bell.
- At the position of the bell, tie the stems of the feathers to the satin cord using a secure square knot.
- Finally, knot both ends of the satin cord to prevent any fraying.
10. DIY Pom-Pom Cat Toys by PopSugar

If you’re looking to provide your furry friend with exciting toys, homemade pom-pom toys are a perfect choice. Not only are they super easy and quick to make, but they also provide endless fun for your cat. Made from cotton or wool string, these pom-pom toys are entirely safe for your kitty.
- Cotton or wool string
- Scissors
- Begin by choosing your string material. Hold one end of the string in your palm.
- Wrap the string around your hand multiple times, at least 50 times. The more loops you make, the denser your pom-pom will be.
- Carefully slide the looped string off your hand. Use another piece of string to tie tightly around the center of your loops.
- Use your scissors to cut through the looped ends of the string on both sides of the knot. This will create the fluffy ends of your pom-pom.
- Trim the ends of the pom-pom as needed to create a uniform and round shape.
11. DIY T-Shirt Knots for Cats by Muslin & Merlot
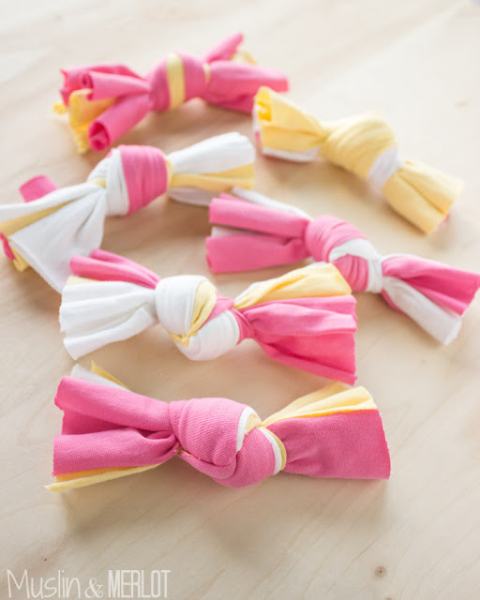
If you have some old, colorful T-shirts lying around, why not turn them into simple and entertaining toys for your feline friend? This DIY project requires just a few materials and offers a sustainable way to repurpose your worn-out tees. Plus, these knots are perfect for both cats and small dogs to play with!
- 2 or 3 T-shirts
- Scissors
- Ruler
- Cutting mat and rotary cutter (optional but helpful)
- Begin by deconstructing your chosen t-shirts. Cut along each side seam, and then cut away the sleeves and neck. This should leave you with flat pieces of fabric.
- From each flat piece of fabric, cut out rectangles that measure 3 x 10 inches. If the sleeves are large enough, you can use them too.
- Collect a stack of six strips from your cut fabric.
- Next, take each strip and slightly stretch it so it curls up onto itself. This makes the knot more durable and easier for your pet to play with.
- Take your curled strips and tie them into a firm knot. Pull the ends tightly to secure.
- Lastly, trim the ends to give your toy a neat appearance.
12. DIY Cat Scratching Post by Cuteness

Cats instinctively scratch surfaces to mark their territory and exercise their muscles. A homemade scratching post is an ideal solution to keep your feline friend from scratching on furniture or door frames. You can create one with your preferred decorative touch to suit your home décor.
- Sisal rope (3/8-inch (10 mm) or 1/4-inch (6 mm) diameter)
- 4 x 4 fence post cap
- RIT dye or any pet-safe non-toxic fabric dye (two colors)
- 18-inch plywood circle (3/4-inch thickness minimum)
- 1,200-grit sandpaper
- 16 half-inch roofing nails
- A drill
- Four 3-inch wood screws
- Optional: Pom-poms, balls or refillable catnip toys, catnip spray
- Start by understanding the preferences of your cat. Observe the surfaces and materials your cat enjoys scratching the most.
- Procure the sisal rope based on your cat’s preferences. A thicker diameter rope will offer more durability and depth for your cat’s claws, while a thinner rope is easier to handle for a first-time DIY project. Make sure to get a pet-safe rope, and avoid any that’s been treated with oil.
- Determine the right amount of rope you’ll need for the post using an online sisal rope calculator. The height of the post should be equal to the full stretch height of your cat, usually about 3 feet.
- Once you have the rope, consider dyeing it to match your décor. Choose your colors and follow a color mixing guide to achieve your desired shades.
- After the rope is dyed and dried, start creating your scratching post. Attach your chosen fence post cap to the top of the post, then begin wrapping your sisal rope tightly around the post, securing it with the roofing nails.
- When the post is completely covered in rope, attach it to your plywood base using the wood screws. Make sure it’s stable to withstand your cat’s play.
- Optional: Attach some cat toys to the post for added fun, and use a catnip spray to make the new scratching post more appealing to your feline friend.
- Finally, place the scratching post near your cat’s favorite nap spots, entrances to rooms, or any other areas they frequently scratch.
13. DIY Cardboard Cat Play Box by Charleston Crafted

Cats often show more interest in the packaging a toy comes in rather than the toy itself. So, why not turn the packaging into a toy? Here’s a DIY guide to turning a cardboard box into a cat playpen, a perfect two-in-one project that your cat will love!
- Large cardboard box (big enough for your cat)
- Packing tape
- Box cutter or scissors
- Craft supplies (string, pipe cleaners, pom-poms)
- Hot glue
- Start with a cardboard box. It can be a leftover box from a delivery, as long as it is big enough for your cat to fit comfortably inside.
- Use packing tape to seal the box and make it a perfect cube.
- Use a straight edge like a ruler and your box cutter or scissors to cut out the inside of each side of the box. Leaving a 2-inch frame around each side will provide a good balance of sturdiness and visibility.
- Now it’s time to get creative! Use your craft supplies to add interesting features to your box. For instance, you could make little pipe cleaner fish or birds, attach them to strings, and then secure them to the box using hot glue. The dangling features will provide your cat with endless entertainment.
- After you’re done with your crafting, let your cat enjoy their new play box! It’s the perfect way for them to work up an appetite.
14. DIY Jellyfish Ribbon Catnip Cat Toy by Your Purrfect Kitty

Cats are renowned for their love of catnip, which can provide them with hours of amusement. But rather than scattering catnip, why not incorporate it into a homemade toy? This simple DIY project will guide you through making a cute and durable jellyfish-shaped toy filled with catnip that your cat will love.
- Felt sheets
- Ribbons
- Scissors
- Glue
- Sesame seeds
- Catnip
- Needle
- Thread
- Permanent marker
- Begin by folding a sheet of felt in half and cutting out a half-circle shape. This will form the body of your jellyfish cat toy.
- Using a fine-point permanent marker, draw a face onto one side of the jellyfish. Remember to keep it simple; avoid using googly eyes or anything else that might come loose and pose a choking hazard.
- Put the two halves of the jellyfish together. Using a thread color that matches your felt (or a contrasting color for a more striking look), sew the curved part of the half-oval together. An overhand stitch will do the trick; you don’t need to do anything fancy here.
- Once you’ve stitched the top of the jellyfish together, open the bottom to create a space for your filling. Pour in around 2 teaspoons of catnip and sesame seeds or as much as the toy will comfortably hold.
- Now it’s time to add the ribbons. These will form the jellyfish’s tentacles. You can use glue to secure them, but for a more durable finish, consider stitching them into place.
- After adding the ribbons, sew the bottom of the jellyfish closed to keep the catnip and sesame seeds securely inside.
- Your jellyfish ribbon catnip toy is now ready for your cat to play with!
15. DIY Cat Grass Food Puzzle by Chirpy Cats

Here’s a fun way to keep your cat entertained with a cat grass food puzzle. The materials are likely things you already have around your house, so it’s an easy and fun project that you can do for little to no extra cost!
- Cat grass seeds
- Empty egg carton
- Acrylic paints and brushes (optional)
- Grow mats
- River stones or tiny rocks
- Hemp plant food (optional)
- Recyclable household items like bread ties, milk rings, or bottle tops
- Cat toys, such as foam balls, bell balls, or feathered toys
- (Optional) Paint the underside of the egg carton in fun colors. Allow the paint to dry thoroughly.
- Put about four stones into each center cup of the egg carton. This adds weight and volume, providing a medium for the grassroots.
- Cut the grow mats to fit the size of the carton cup openings, then soak them for about 30 seconds. Gently squeeze and place them over the stones in the carton cups.
- Sprinkle a layer of cat grass seeds on top of the grow mats. Make sure not to overcrowd the seeds, as this can lead to mold growth. Spray the seeds with water.
- Using a screwdriver, carefully punch holes in the egg carton cover. Place the covered tray of grass seeds in a dark place. These holes will encourage air circulation and prevent mold during germination.
- Over the next 2 days, check the cat grass seeds a few times per day, and keep the seeds moist by spraying them with water.
- On day 3, when the shoots are about 1/2 inch high, move the carton to a sunny location. Continue to keep the cat grass moist.
- By day 5 or 6, your cat grass tray should be ready to use as a food puzzle. Sprinkle some kibble in each cup, and cover them with cat toys or recyclable household items.
- Your cat grass food puzzle is now ready to be enjoyed by your feline friends. It’s a great way to stimulate their natural hunting instincts and provide some indoor entertainment.

Final Thoughts
DIY cat toys don’t have to be complicated projects to produce fun and entertaining results for your cat. Everyday household items can be recycled and repurposed to create brand-new toys for your cat. The crafts that we’ve provided here are some of the easiest toys to make, and they also leave room for you to add your personal touches.
When you invest a little time in making your own cat toys, you can end up providing hours of fun for your cat. Giving your cat toys and playing with your cat can significantly increase the bond you share. We hope you and your cat enjoy many entertaining moments and make special memories while playing together. Remember, always supervise your cat while they’re playing with homemade toys to ensure their safety.
Related Reads:
Featured Image Credit: kou2341, Shutterstock