How To Fix A Leaking Fish Tank & Seal It (6 Main Steps)

Updated on

Although fish tanks are really cool, unfortunately, they are not bulletproof and they are certainly not indestructible. What we are getting at here is that fish tanks can and do spring leaks. Here we are not talking about a crack in the tank, as that is a whole different issue, but about the sealant.
Sometimes the sealant on fish tanks, that layer of black in the corners, can go bad. It breaks, wears down, and starts to let water through. We’re here today to help you fix your leaky fish tank.

How To Find A Leak In A Fish Tank
If you do not already know where the leak is, you’ll have to search the tank carefully. Check the water level first. If there is a leak, the water level will go down past the leak, but no further. That way you will know that the leak is somewhere above where the water level remains constant. Try to find if there are any disconnected parts or obvious breaks in the silicone sealant. Finally, you can wrap some paper towels around the tank and wherever it gets wet is where the leak is.
The 6 Steps To Fix A Leaking Fish Tank
We want to make things as simple as possible for you, so let’s go over how to fix a leaking fish tank in a step-by-step manner. This is going to take some work, and you need to buy a few materials, but it’s really not that hard, so let’s get right to it.
1. Step 1 – Prepare The Tank
The first thing that you need to do is to prepare the tank so you can fix it. You need to drain out enough water so that the leaky area is exposed and no longer submerged. You can use a bucket or cup to remove enough of the water. If the leak is really low down in the tank, you might have to empty all of the water and put the fish and plants in a holding tank until the fix has been completed.
You will need to plan because the sealant that you use to fix the leak will need to dry and cure, and your fish might have to stay in a holding tank for a few hours or even a couple of days. Make sure to prepare for this scenario.
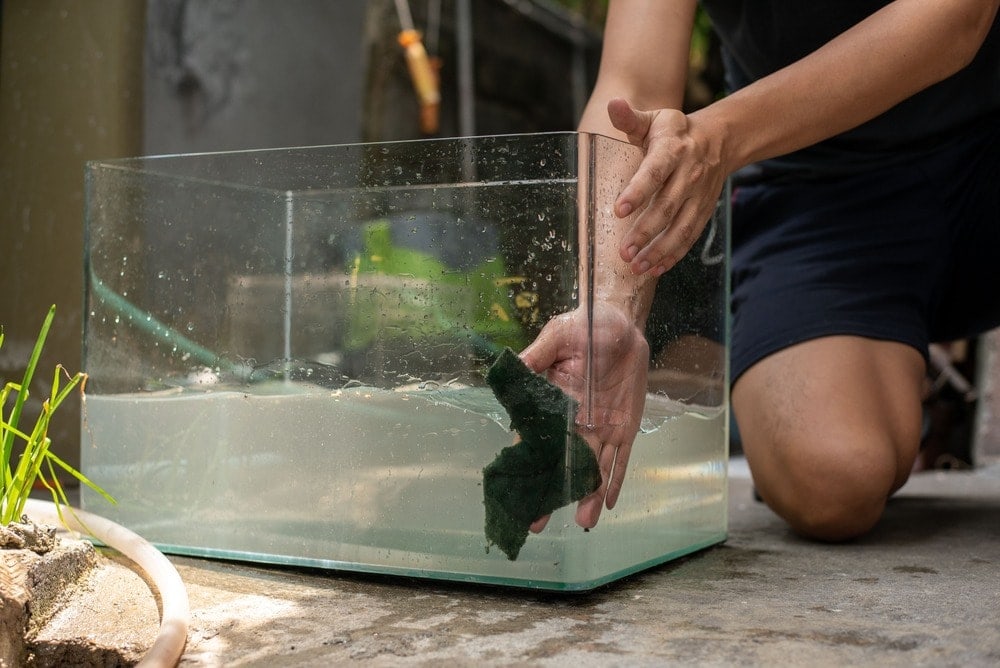
2. Step 2 – Removing The Old Sealant
The sealant is the problem, so to fix the leak, you have to scrape away the old sealant. The best thing to use is a razor blade scraper. It won’t scratch the tank but will remove the old sealant with relative ease.
The scraper is also ideal because you want to remove the sealant on the inside corner, but you do not want to remove the sealant that is actually connecting the two glass panes. Make sure that you do not remove the sealant between the glass or you will more or less wreck the whole tank.
Keep in mind that new and old sealant or silicone do not bond well with each other. If this is a concern, you are better off removing all of the old sealant inside of the tank. Be sure not to drop any of the old sealant in the tank, as you won’t be doing yourself or your fish any favors.
3. Step 3 – Clean The Area To Be Sealed
You need to clean the area that you are going to seal. New silicone won’t stick well if the area is dirty. If you don’t clean the area well, you are likely to end up with another leak sooner than later. Use some acetone and a damp cloth to clean the old silicone away, the residue that is. Clean away all residue and dirt until the area is squeaky clean.
4. Step 4 – Seal The Leak
Now it is time to actually seal the leak. The most important thing to remember here is that you absolutely need to buy 100% non-toxic silicone. Make sure the sealant is 100% silicone and 100% nontoxic, and it should not have any fungicide in it. If you forget and you buy silicone that is not meant for aquariums, you will poison the water and your fish. Use a caulking gun to run a bead of silicone along the area that leaks.
Use a damp finger or a caulking tool to smooth the bead of silicone out. You don’t want it sticking out too far. If it sticks out too far, not only will it look bad, but fish might be tempted to nibble on it. If you are thinking of attempting to repair the leak from the outside of the tank, consider that most aquarist repair leaks from the inside. Repairs are more durable when they’re performed in the interior.
5. Step 5 – Letting The Sealant Dry
Let the sealant dry and cure. If you add water back into the tank before it has cured, it will become soft, it will peel, leak, and the whole process will have been for nothing. Silicone requires 24 hours to dry at the very least, but to be safe, you should give it 48 hours to cure entirely. You can use a heat lamp to make it dry faster, but beware, do not heat the silicone to over 110 degrees. It will melt or degrade at the very least.
6. Step 6 – Check For Leaks
Time to fill the tank back up. Just fill it up to a little bit past where the leak was. Keep in mind that the water pressure and weight of the water are vital factors. So, wait for about an hour after filling the tank past the leak, then fill it up a little more, then wait for another hour.
If you still don’t see any leaks, fill it up all the way and wait for a little longer. If you are not sure whether or not there is a leak, place dry paper towels along the outside of the tank where the leak used to be. This will make it easier to spot. Now, if there is still a leak, you will, unfortunately, have to start this whole process over again. However, most people would probably just give up and buy a new tank, which is definitely an option.
It’s probably a good idea to keep some buckets and towels nearby in case there is still a leak in the tank. If there is no leak, you are free to set the tank back up and put your fish back inside of it.
 How To Seal A Fish Tank
What’s The Best Aquarium Silicone?
If you have a leaking aquarium, this particular aquarium silicone for aquarium leak repairs is a good option to consider using in our opinion.
MarineLand Silicone Squeeze Tube
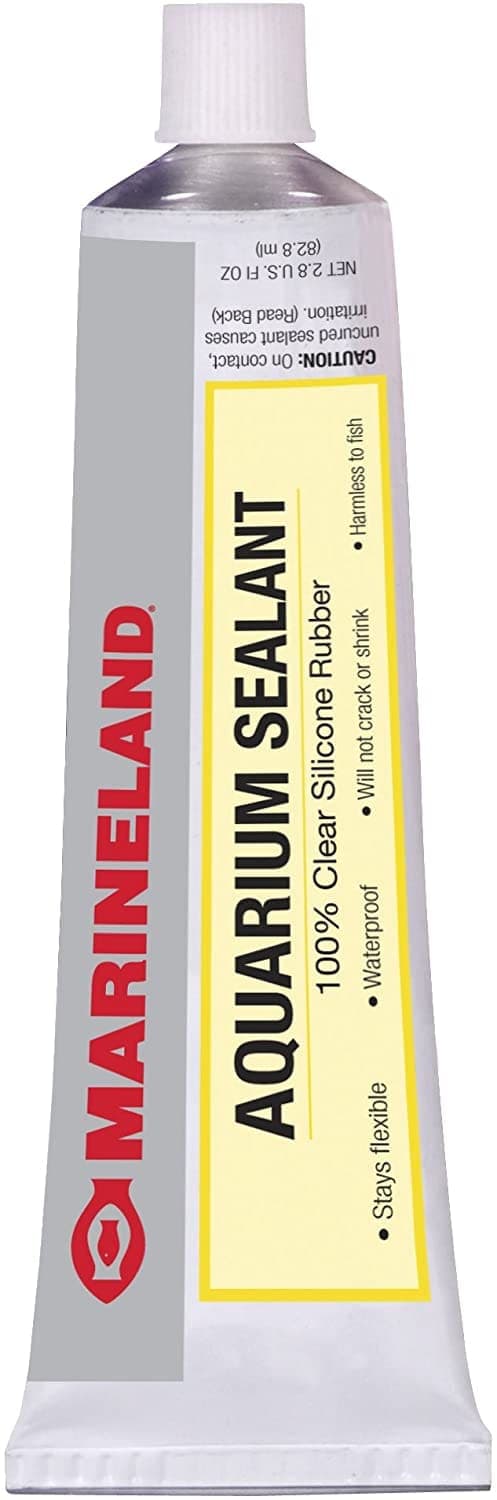
Our favorite sealant is the MarineLand silicone squeeze tube. All you have to do is thoroughly clean the area that is leaking and ensure that it is perfectly dry. Keep in mind that to use this product properly, you need a caulking gun. Simply squeeze the silicone product into the crack or leaking area and use something flat to scrape away the excess.
Then, according to the product instructions, let it dry before putting the water back into the fish tank.
- Very easy to use.
- Seals well.
- Quick-drying.
- Requires thorough cleaning before use.
- Requires a caulking gun.
FAQ
How long does aquarium silicone last?
Generally speaking, an aquarium repaired with a silicone product, such as the ones discussed here today, should stay solid indefinitely. However, the deciding factor is how well of a job you perform when repairing the crack or leak. More or less, if you do a good job, it should last forever.
However, if you do a bad job, your aquarium might start to leak again right away. It really all comes down to the quality of the work.
Can you use regular silicone to seal a fish tank?
Technically speaking yes, most silicone products should do the trick, but some are not waterproof. If you choose to not use aquarium silicone specifically designed for aquarium repairs, you need to ensure that it can form a watertight seal and that it can handle a lot of pressure. For the most part, it is recommended that you use real aquarium silicone for repairs.
How common are aquarium leaks?
This is a hard question to answer since it all depends on the quality of the aquarium you purchase. If you purchase a low-quality aquarium, chances are that it may start to leak within a year or so. However, if you go for a high-quality option, unless you hit it with something or drop it, it should not ever leak. Keep in mind that glass aquariums are more susceptible to springing leaks than acrylic aquariums.
Should I get a professional to fix my tank?
No, if you only have a small leak or crack, and you have the proper aquarium silicone and the proper tools, there is no reason why you cannot fix your tank by yourself. It’s really not that hard at all. However, if there is serious damage to your aquarium a professional repair may cost way too much.
More or less, if the leak is so severe that you have to get a professional to fix it, you may just want to consider springing for a new tank.
What can I do to prevent my fish tank from leaking?
There are a variety of tips and rules to follow if you want to ensure that your aquarium does not spring a leak. Keep in mind, this is not foolproof, but these tips can certainly help.
- Use gloves to handle the tank.
- Make sure the aquarium is perfectly flat and level.
- Ensure all rocks are fastened or tied down (or don’t move the tank with rocks in it).
- Never move the tank around when there is gravel or any kind of hard decorations inside of it.
- Never fill your aquarium up more than the recommended level (water is heavy).
With that said, the vast majority of aquarium leaks are caused by improper or low-quality seals. Chances are that if your fish tank leaks, you had nothing to do with it.

Conclusion
The last thing that we want to say is that you need to know which leaks can be fixed and which ones can’t. The leaks that occur in corners due to bad sealant can be fixed. However, if the tank itself is cracked, such as a side or bottom pane, you are out of luck. You will need to get a professional to replace the whole pan, which in many cases will end up costing more than just buying a new tank. If the glass is cracked, water pressure will only make the crack bigger, which is often still the case even when the original crack is fixed.
Featured Image Credit: hedgehog94, Shutterstock