10 DIY Cat Scratching Posts You Can Make Today (With Pictures)
By Ashley Bates
Updated on

It may seem like cats love to scratch things out of the pure, unadulterated joy of destruction—at least that’s how it feels when they tear up our expensive furniture! But the urge to scratch is an instinct for cats.
Cats have scent glands in their paws, and scratching is a way to leave their scent around their territory and the visual territorial mark of scratches. Scratching also keeps their claws healthy and allows them to deeply stretch.
Giving your cat a scratching post can save your furniture and keep them physically active. Fortunately, you don’t need to drop big bucks on purchasing a scratching post, as there is an extensive range of easy, cheap, and fun DIY projects. Here’s a collection of our absolute favorites!

The 10 Best DIY Scratching Posts
1. A Simple & Classic Scratching Pole by Dream A Little Bigger

- Staple gun
- Hammer
- Utility knife
- Drill
- Saw – hand or miter
- Circular saw (optional)
- Sisal rope
- Wood glue
- Post cap
- Screws
- Nails
- 4×4 lumber
- 75-inch plywood
- 75- inch decorative edge (optional)
This DIY cat scratching post plan is simple enough that even novice DIYers will be successful! Our favorite thing about this plan as the resulting scratching post will last you and your cat years to come. It’s durable in its design, but it also features a replaceable scratching surface which can be changed over time as the sisal rope wears.
For this reason, this one scratching post can save you hundreds of dollars by being initially cheap to construct and as durable as multiple commercially produced posts would be. It’s also customizable, with the base plate able to have colorful carpet attached.
2. A Stylish Vase Scratcher by Meow Lifestyle

- Hot glue gun
- Large, sturdy vase (avoid glass)
- Sisal rope
- Weights – garden rocks are ideal
- Base plate (optional)
If you lack tools or constructive ability, this plan may be for you! It’s simple enough that even the most inexperienced crafter could make it in a breeze. The basic premise is a large, sturdy vase with sisal rope glued around it.
An appropriate vase can be easily found at your local stores with only a few dollars. It’s best to avoid glass as it is more delicate and likely to break if knocked over. Something along the lines of thick ceramic would be ideal. Within the vase, use rocks to weigh down the vase to be sturdy enough for your cat to play rough.
We like this plan as the finished product is stylish enough to mix with any home decor. Fill the vase with decorations or dangling toys for your cat to play with.
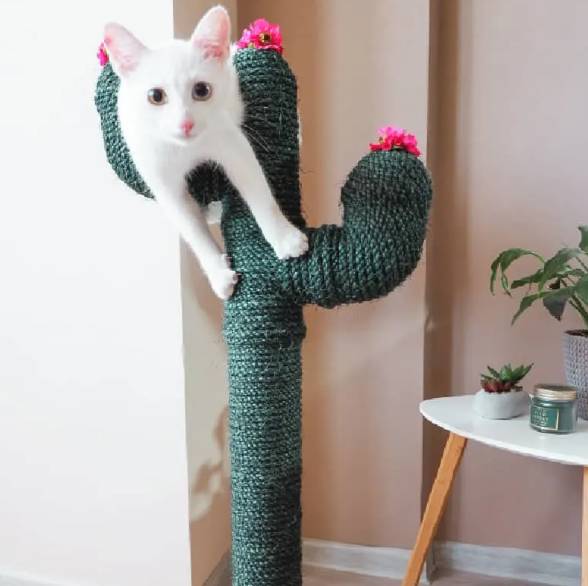
3. A Funky Cactus Scratching Post by Miss Molly Says
- Glue gun
- Drill
- Plywood
- Sisal rope
- Weights – stones or concrete
- Screws
- Piping – straight pipe, elbow pipes, piping lid
- Polystyrene balls (3-inch diameter)
- Green dye (pet safe)
- Optional: green spray paint, fake flowers
At first glance, this cute cactus scratcher may appear to be something machine produced and sold in pet stores; it’s that good! Don’t feel intimidated by its appearance. It is a surprisingly easy DIY project that requires minimal tools. All the materials needed are easily found at your local hardware store.
We really love this plan because it’s easy for DIYers of all levels but produces a fantastic outcome that will impress all your friends and family.
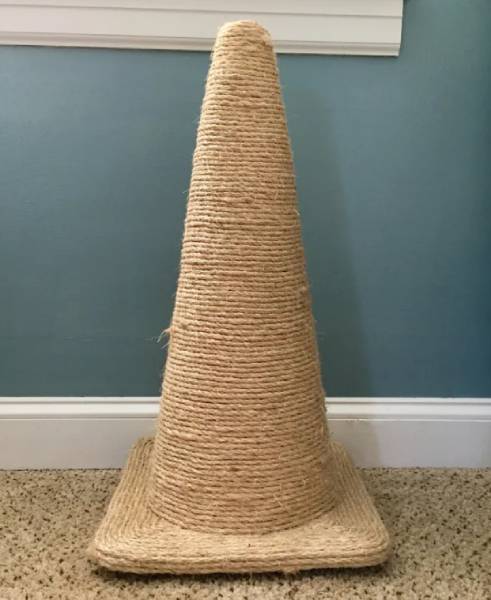
4. A Post Made From a Road Cone by Live. Love. Create. Repeat.
- Hot glue gun
- Sisal rope
- Road cone
It doesn’t come more straightforward than this one as far as DIYs go. You need only two minor things to create an excellent scratching post for your cat, a road cone and natural rope. The cool thing about this DIY scratching post is it doesn’t need any weights or added base plates to keep it steady. The design of a road cone is already adequately balanced, and if your cat does knock it over, it’s light enough that it won’t cause any harm.
Now, sourcing a road cone should be done correctly! We do not encourage taking one from a construction area as they are essential safety items (also, that’s stealing). However, sizable industrial road cones can be purchased from hardware stores, or you may even find some old ones at dumps. All these old cones need is a little bit of a clean-up to give them a new life getting brutalized by your cat’s claws.
5. A Modern Scratching Post by Autodesk Instructables

- Drill
- Sandpaper
- Saw
- Sisal rope
- 10×1 wood
- Screws
We provide our cats with so many scratching post options in the home because we are trying desperately to save our furniture from the fate of cat claws. But some cats are picky and love to scratch our couches regardless of what scratching posts we offer them. If that’s your predicament, then this plan is for you!
This DIY scratching post is unique because instead of being freestanding, it’s built to sit over the arm of seating furniture. This vertical scratching service will offer your cat the texture it is craving for its claws and protect the edge of your couch from a disastrous fate. As a bonus, it also acts as inconspicuous decor and a place to put your cup of coffee as you relax on the couch.
6. A T-Shaped Scratching Pole by A Little Craft In Your Day

- Saw
- Wood glue
- 5-inch dowel
- Plywood base plate
- Natural rope – jute or sisal
- Optional: paint, pompoms, cat toys
Here’s another slightly different plan from a traditional vertical scratching post. This scratching post is constructed in a ‘T’ shape that not only gives more scratching surface area but provides a place to hang toys for your cat. Incorporating fun and play into your scratching posts will increase your cat’s likelihood to use it and not your couch!
This plan is great on its own and relatively simple, but it also has room for some creative direction. You could add any toy for a stylish design or a colorful look. Have some fun with this DIY and create something totally unique.
7. Life of Pot Pie DIY Cat Scratching Post by Life of Pot Pie
- Glue gun
- Drill
- Saw
- Sandpaper
- Measuring tape
- Pencil
- Boards
- Plywood
- Sisal rope
- Screws
- Glue sticks
- Carpet tape
This is a very sturdy cat scratching post by Life of Pot Pie. It involves some woodwork, using tools like saws, drills, and such. So, make sure you’re comfortable with the process before you begin.
In this particular DIY, they use scrap wood, which saves a lot of money on lumber. If you have any boards lying around, you can whip this creation up for next to nothing.
This creator takes you through each step of the process visually. She does a voiceover to explain the process—you can pause as needed, and it’s slow-paced for anyone to follow.
If you follow the instructions listed, you end up with extremely hardy, well-made cat scratching posts that will easily last from kitten to adulthood. It measures 3 feet upon finish and is attractive enough to fit with just about any decor styling.
8. Phil Wyatt Projects Cat Scratching Post by Phil Wyatt Projects
- Box cutter
- Drill
- Hammer
- Miter saw
- Ruler
- Horseshoe nails
- Carpet
- Boards
- Screws
- Carpet tacks
Phil Wyatt Projects offers this excellent DIY project tutorial, creating a perfect scratching post for any home. He keeps things relatively simple rather than using complicated tools and an extended list of materials.
This creator makes a durable cat scratching post out of wood and spare carpet. This completed project will give your cat a different texture to shred—and you can choose virtually any carpet you wish.
You can whip this cat post together if you have a few basic tools. You can even add your own touches to it.
9. Eamon Walsh DIY Ultimate DIY Cat Tree by Eamon Walsh DIY
- Drill,
- Hole saw
- Chop saw
- Staple gun
- Jigsaw
- Drill bits
- Glue gun
- Brad nailer
- Plywood
- Fleece
- Cardboard tubes
- Twine
- Hot glue
- Sticks
- Screws
- Staples
- Black felt
This Cat Tree by Eamon Walsh is a very intricate design that will give your felines plenty to do. This design will take you a lot longer than creating a simple cat-scratching post, but it can be well worth it for the right creators.
We want to be upfront. This design is going to take a long time to complete, and it takes very specific tools and resources. But if you have the time and gumption, this can be a furniture piece you can keep in your home for years to come.
The creator uses a time-lapse video to demonstrate the construction. There is also a list of materials, tools, and other tutorials to help you along the way in the description. The result gives you a beautiful three-tier creation with lots of space to nap, scratch, and play.
10. The Craft Chronicles DIY Cat Scratcher by The Craft Chronicles
- Miter saw
- Tape measure
- Iron
- Sandpaper
- Sisal rope
- Screws
- Wood
- Aluminum foil
- Iron-on glue tape
This DIY Cat Scratcher by The Craft Chronicles is an easier option with some pretty nifty hacks (like iron-on glue tape). This particular DIY takes only two pieces of wood and sisal rope for an ultimate finish.
This basic DIY design is potentially the cheapest on our list and requires the fewest tools. So if you’re looking for an easier option, be prepared to spend some time on it, but know that it might be the most beginner friendly.
Even though this creator didn’t do anything to the wood base, you can always stain it or cover it with carpet to personalize and help it match your home decor.

Final Thoughts
We’ve only scratched the surface of DIY projects in our list today, but we hope our top 6 picks will give you a fun project for a rainy day or inspire a custom DIY project of your own. You can save money and have fun creating a scratching post at home for your cats, and you’ll feel a true sense of satisfaction watching your cat enjoy something you have made with your own two hands.
Featured Image Credit: Daga_Roszkowska, Pixabay